He would be most happy if I could find old bird baths, maybe a claw foot tub to plant flowers in and a few large garden statues. Gnomes? Giant dolphins? Maybe a windmill or 2? He thinks, YES! It's going to look more like a Goofy Golf course then a wooded trail in the middle of nowhere. Speaking of which....if you happen to know a mini golf course selling off their props, we might be interested! lol
As you can imagine, this has the possibility of getting very expensive (and weird! It's gonna be so so weird!) so I'm always looking for cheap, free or recycled things to use. I came across these suncatchers on Craftster. (would love to link, but there are at least a dozen contributors to the 2 different threads) They are simple and the kids can help with part!
Make your own suncatchers
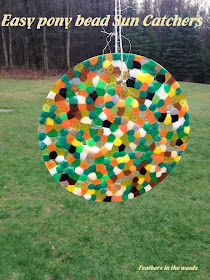
All you need are pony beads, an oven and a baking pan.Simply place the beads in the pan.....my son arranged his into a rainbow for his step moms Mothers Day present (sorry, forgot to get the picture out of his ipod...will add later!) No cooking spray or oiling needed. Bake at 400 degrees for about 20 minutes. Let cool and the sun catcher will pop right out. Simply drill a hole and hang. You might even be able to skip the drill part if you left a gap between a few beads. That's it!
I also used a mini bundt pan to make mini sun catchers. I hung them from a 'natural' stick in a sort of wind-chime formation. I used pony beads that I had left over from other projects, but bulk pony beads are pretty cheap if you need to buy new. I'm planning on making a red white & blue one, and Hubby wants one with a smiley face on it. The woods are looking fancier already!
~L
Want gardening and healthy living information sent right to your email weekly? Click right here to join my newsletter list and get new posts sent directly to you the day they're published!


This is something I have been meaning to do for a while! I think it would give my porch some color, and might look cute in the woods, too! :)
ReplyDeleteYou should make some...they were super easy!
Delete~L
Looks like a fun project to do with the grandkids
ReplyDeleteExactly! My son had so much fun arranging the beads. He kept saying "this is fun" lol
Delete~L
What a marvelous idea! And they look so pretty!
ReplyDeleteThank you!
Delete~L
Oh I really love this idea, he is not so weird I think:) B
ReplyDeleteYou should try it....but yeah, he is a little weird ;-)
Delete~L
That's so fun and what an easy project for the kids to do! I'm always on the lookout for those!
ReplyDeleteMy son did everything but the baking. He had so much fun. Your kids will love it!
Delete~L
Love it. Did it ruin your pan???
ReplyDeleteI did use an older pan just in case, but the pan was fine.
Delete~L
love this idea! thanks for sharing - I came from Ladybug blog hop
ReplyDeleteThanks! (love that hop!)
Delete~L
So pretty! Great idea! Thanks for linking up to Give Me The Goods Monday! We love having you party with us! Jenna @ Rain on a Tin Roof
ReplyDeleteThanks! I'll stop by again this week!
Delete~L
So neat! Love this idea :) We can't wait to see what you share at tomorrow's All My Bloggy Friends!
ReplyDeleteThanks! I'll stop by again!
Delete~L