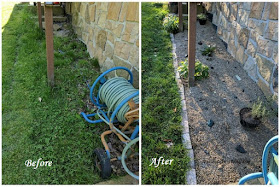
The base of the stairs seems rather large and just sort of ends. Random concrete stepping stones and large rocks were all chucked under there. The dirt was uneven to the point that if you were to walk under there, you'd trip constantly.
I don't think grass was ever planted under there as it was a tangle of weeds amid bare spots. The size, shape and slope of the area made it awkward to cut with the mower. Even when it was all trimmed up with the weed wacker, it just always looked sloppy.
Finally I got sick of it and decided to get it fixed. First I talked to a landscaper that wanted almost $200 to redo the area. Apparently the fact that the house was built into a hill on one side made it more difficult.
After I stopped laughing, I started planning. I don't really have any experience with landscaping though, so there was no telling how this new garden project was going to turn out!
I mean, I can replant garden beds but putting them in completely was going to be a new adventure!
Plus this bed was going to be the special home to a night blooming plant.
My friend Jenny had been fascinated by the fact that some flowers bloom at night. Like morning glories, but backwards. She died a few years back and I had been trying to grow night blooming flowers ever since. This year was the first year I succeeded.
I had 2 of these plants that needed a home, so I had to get this right!
Between planning and finish, this new garden bed project took several turns. I knew I needed to completely remove all the grass and weeds under the porch and replace it with something weed resistant.
 |
| Click on pictures for a better view! |
I decided a weed barrier was necessary and thought mulch would look nice. The husband shot that down with a few snarky comments about wood chips and termites near a wood sided house. *sigh*
Luckily we had a pile of pea gravel left over from when the coops were built. The gravel quickly became my replacement for the wood chips.
As I looked around at the materials (odd and ends) I had around the garage, I realized that this was not going to be expensive at all. I was just going to have to do the work all myself. Well, not quite all myself... I was going to make the teenager help too.
To prepare the area I first power washed the side of the house. There is no way I was going to do all this work then have it messed up by the water blasts from power washing!
Since the area was nice and wet, we then ripped out the weed clumps and dumped some dirt in there just to even out the high and low spots.
This area under the porch is defined by 3 sides. The base of the porch steps to the left, the house in the back and the back patio on the right. I decided we needed something to edge it with to keep the pea gravel in and make a clean line separating it from the yard.
We measured the length of the area and headed to Home Depot where we picked out some landscaping bricks. I chose 2 different colors of the same style bricks.
The foundation of the house is multicolored stone, so I thought the 2 colors would be a good choice. The area is almost 15 feet long. I bought 25, 7" long bricks that cost me $17.23.
Luckily I already had some industrial strength shipping plastic that had come wrapped around something my husbands work ordered. I was going to use this for weed barrier.
Not only was I recycling, but it was free. If I didn't have it, this would also be the place to pick up weed barrier since they had several types to choose from. These run about $10 a roll but you can a=often find them on sale at the end of the season.
Once home we grabbed some twine and ran it from the front corner to the back corner to make a straight line. We used a long handle scraper to cut a line in the grass for the edge of the bricks.
The easiest way to do this was to position the scraper at the edge of the line and press down while stepping on it with one foot. Sometimes we had to rock it side to side to get it to cut through the grass and dirt.
Once it is in the earth about an inch, pull the handle back toward you then push forward lifting the grass and dirt up. You should be able to just pull the sod chunks away, but I had to cut roots on some of them.
It was a little tricky to get my trench even, but a lot of that had to do with the slope I was working with. It was much easier on the flat end!
We laid all the bricks in the trench then removed the uneven ones and evened the dirt out with a small spade. Once they all sat in the trench evenly we pulled them back out.
Next we cut the weed barrier to fit and placed it over the area. We replaced the bricks to hold down the fabric.
Using an exact-o knife, I cut holes in the weed barrier where each plant was to go. I started by cutting an X. I made each line of the X 12". Then I cut the center out.
I cut out a 4"x4" square where the plant would be. I did this so I could fold the flaps of the X back to dig and place the plants.
After the planting is done, I fold the pieces of the X back into place and hold them down with fabric pins to minimize weeds. I get fabric pins at the Dollar Tree when they put their spring items out, but HD also has these if you need them.
I transplanted one of the Red Veined Sorrels that I had growing in my main garden as the centerpiece for this garden.
Next to each porch support I placed the 4 O'clocks called Marvel Of Peru. I had started them from seed so they were ready to bloom right away.
Related reading: How to grow 4 O'clock flowers from seed
Since this area only gets a few hours of direct sun in the morning, I had to go with shade tolerant plants. I also planned on adding Hostas on each end, but the deer ate mine before I could thin them this year.
Instead I brought over some potted herbs to add some height and greenery.
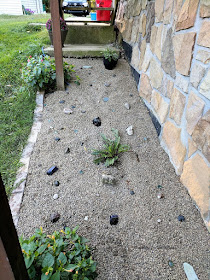
Once all the plants were in place we filled it in with the pea gravel. I added some stones and decorations that were getting ignored in my more crowded gardens and called it done.
Not bad for under $20! In the spring, I'll replace the potted herbs with Hostas when I thin the ones in my rock garden out.
Since all I purchased for this project was the bricks, it cost me less then $20. If I had to purchase everything new, it would cost closer to $65.
Still much better then that $200 the landscaper wanted and he hadn't even included a cost for the plants since I already had them! This project took me about 4 hours to complete.
The most amount of time was spent on the trench for the bricks.
Bricks: $17
Weed barrier: $10
Weed fabric pins: $1
Mulch: $15 for gravel, wood chips are often 3 bags for $10
Plants: $2 (seeds and transplants) Less then $20 for new plants
Unfortunately you can still see the blue hose that runs through the area in one part, but it looks a great deal better then it did! I'll post updated pictures in the spring when I get the Hostas in.
This was a fun project and not very difficult at all. I will definitely try another landscaping project in the future, especially if it saves me that much money!
~L
Want gardening and healthy living information sent right to your email weekly? Click right here to join my list and get new posts sent directly to you the day they're published!


Looks great! And clever reusing plastic for the weed barrier. I'll have to remember that for any future projects.
ReplyDeleteCarrie
Thanks! I love reusing instead of buying new.
DeleteLisa