When my kids were little I had typical screwed up, parents sleep schedule. I was often trying to fall asleep when I had time to sleep and not necessarily when I was tired! Yeah, that! I got this cute little sleepy time teddy bear with a little lilac colored robe on and he was filled with lavender. I would set it on my pillow next to my face and it would help me fall asleep.
The kids knew this and if they couldn't fall asleep they would ask me to bring them "smell my butt teddy". That was the teddy bears name because the lavender scent was strongest at his butt. lol Kids are funny.
Well it's many years later and I still use a lavender spray or lavender eye pillow to help me fall asleep some nights.
So I started thinking that a lavender gnome would be super easy to make and really cute, plus ya know, gnomes are trendy right now! I've made a lot of gnomes as décor, so I decided to write out the way I do it and show you how I make this cute little gnome to help you fall asleep faster.
Since gnomes are small, this is a perfect project to use up scraps of fabric and notions.
Also since you're using socks and they come in all different sizes I can't give you exact measurements for things like the hat or the beard. So what I'm going to do instead is show you how I measure on my gnome to get the right size every time.
I have a gnome on my porch that's 3 feet tall, so this method works for all sized gnomes! Lets start with the gnome with the white beard and purple hat.
Related reading: Make your own Lavender sleep sprays! Face mist and linen spray recipes!
Aromatherapy Bedroom Gnome with Lavender
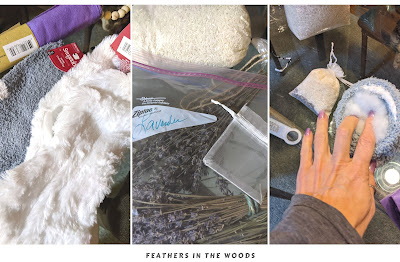
Lets start by getting everything together.
Supplies you'll need:
- Dried lavender buds
- Rice
- Small organza bags
- Poly fiberfill
- Hot glue gun & glue sticks
- Rubber bands and embroidery floss or yarn.
- Socks for body
- Either a fuzzy sock for hat or felt
- Wood bead or pompom for nose
- Notions and decorations
How to make your gnome
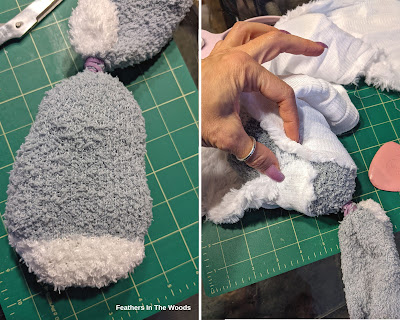
1) put 1-2 tablespoons up dried lavender flowers in the organza bag. Fill with rice. Leave enough room to tie tightly. You can add a few drops of lavender essential oil to the rice if you want a really strong lavender scent.
2) Place bag flat in the bottom of sock for stability and weight.
3) Add fiberfill to make gnome body. Once you have the size you want, gather the sock together and fasten with a rubber band.
 |
| You can click on any image to make it bigger! |
4) Wrap your fur around your gnome body and use fabric chalk to mark where the pieces meet on the back of the fur. Also mark the bottom of the gnome so you know where to end the beard. Connect these chalk marks to make a u-shape and cut out.
5) Fit beard to the gnomes body and trim if necessary. Don't glue it on yet though, I like to put the hat on first.
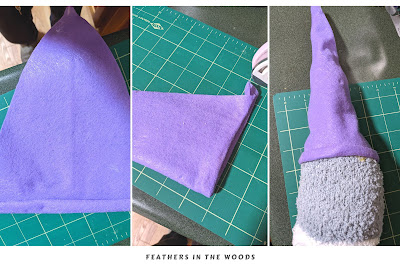
6) For the hat you're going to do the same method to measure how wide your felt needs to be. Wrap and mark.
Decide how tall you want the hat to be and add about an extra inch and a half. Mark this on the felt, then connect the width with the height to make a triangle shape. Cut out.
7) Roll the bottom edge to make a little brim and add hot glue to hold it in place. Turn your hat inside out, fold it together and hot glue the seam. Trim the excess at the fold. Wait for it to cool then turn your hat right side out.
You might need a chopstick to help poke the very tip of the hat out.
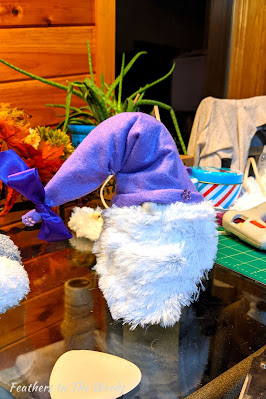
8 ) Place the hat on the top of the body and stuff the excess sock from the body up into the hat to help it retain some shape. The chopstick is helpful for this too! Hot glue hat in place and add decorations.
9) Hot glue your gnomes nose on.
10) Hot glue the beard in place.
If you are making this for a child you can sew the seams of the hat and top of the sock instead. You could also sew the nose on if you'd prefer.
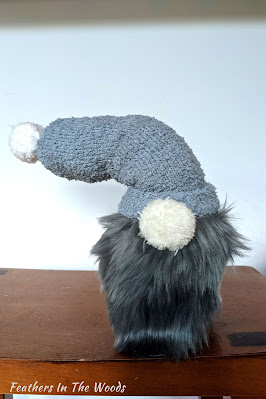
Isn't he cute? Now lets make the other one!
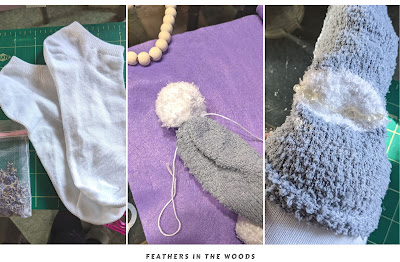
This one is going to use a plain white ankle sock for the body and the fuzzy sock for the hat.
Do steps one, two and three from above using the white ankle sock for the body. I stuffed this sock for the body a whole lot more than the previous one. You'll notice it in the finished product.
Follow the measuring method in step 4 above for the beard. This time I didn't wrap the beard all the way around, but left a gap in the back. You'll want to use your fabric chalk to mark where both sides of the fabric will end on the sides and the bottom. Connect into a u shape with the chalk then cut.
Make sure the fur will be laying the right direction before cutting! Set beard aside for now.
Instead of making a hat like in step 6 above, we're going to use another sock.
Fuzzy socks usually have a white toe and heel. Put a small bit of fiber fill in the toe to fill in out a bit. Tie a string (I used embroidery floss) around the edge of the toe to form a ball. Knot and cut excess off.
Add fiberfill to inside of hat to help it stand up. Push the white heel spot on the sock inward, fold over and hot glue into place.
Once cooled, place sock on gnome body, fold up once to make a brim and hot glue into place. Make sure you hot glue the hat whole way around the gnome or it may try to roll up.
Glue on the beard and trim if necessary.
Glue on pompom for nose.
I didn't add any notions to this one, but it would be cute with some little flowers or bows.
You'll notice the second gnome is bigger than the first even though the second sock was smaller. That because of extra fiberfill. You can make them any size you want....which is exactly why I use the wrap and mark method for the beard and felt hat!
So, after writing out these directions I realized that I did things in a weird order this time! Why would I not make the body, then make hat and attach hat, then make and attach beard? Why body, cut out beard, make hat and attach hat, then attach beard? LOL Unfortunately I photographed in it that weird order too....so it's going to have to stay that way till I make a few more. Sorry!
I totally understand if you make things in a more reasonable order. I normally do. Each step is still right! Any-whoo, I hope you love your lavender bedtime gnomes!
Related reading: How to make a lavender eye pillow and hand warmer set. Great gift idea and can be used hot or cold to soothe a headache!
~L
Want gardening and healthy living information sent right to your email weekly? Click right here to join my list and get new posts sent directly to you the day they're published!


No comments:
Post a Comment